
Key Takeaways
- Here’s a comprehensive guide on automating the creation of AWS S3 buckets using Terraform and GitHub Actions.
- Readers will learn how to establish a seamless Continuous Integration and Continuous Deployment (CI/CD) workflow. This workflow automatically creates an S3 bucket whenever code is pushed to GitHub..
- The article covers the entire process. It includes writing Terraform code and configuring GitHub Secrets for secure credential management. The article provides clear instructions for setting up the necessary components.
- By the end of the post, you will have a fully functioning automation pipeline. This pipeline ensures efficient resource management. It also secures resource management in AWS.
✅ Overview
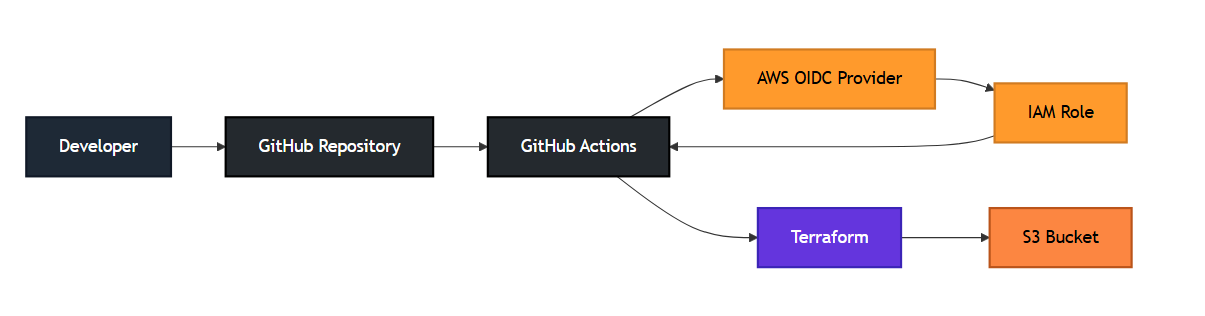
This setup consists of a Terraform project and a GitHub Actions workflow. It automates the creation of an S3 bucket in AWS.
What this project achieves:
- Automated Creation: An S3 bucket is automatically created when the code is pushed.
- Secure Authentication: Uses GitHub Secrets to manage AWS login details.
- CI/CD Integration: No manual intervention is required.
🟦 Terraform Code: AWS Resource Definition
The main files involved in this process are:
main.tfvariables.tfoutputs.tf
What does the Terraform code create?
- One AWS S3 bucket with specified tags (
Environment=dev,Project=terraform-ci-cd) and a name provided from variables.
🟧 GitHub Actions Workflow
The workflow defined in .github/workflows/terraform.yml triggers automatically when you push code to the main branch or create a pull request.
Pipeline Steps
- Checkout Code: Pulls the latest code from the GitHub repository.
- Setup Terraform: Installs Terraform on the GitHub server.
- terraform init: Initializes Terraform modules and provider plugins.
- terraform fmt: Checks the formatting of Terraform files.
- terraform validate: Validates the Terraform configuration syntax.
- terraform plan: Shows the changes Terraform intends to make.
- terraform apply: Creates the AWS S3 bucket on
mainbranch push.
🟩 Using GitHub Secrets for AWS Credentials
The pipeline retrieves AWS credentials from GitHub Secrets:
AWS_ACCESS_KEY_IDAWS_SECRET_ACCESS_KEYAWS_REGION
This approach ensures that credentials are not exposed in the code.
🟫 When Does It Run?
The pipeline is triggered by:
- A push to the
mainbranch
- A pull request to the
mainbranch
Output of the Terraform Execution
After running the pipeline, Terraform will output:
- Bucket Name: Name of the created S3 bucket.
- Bucket ARN: Amazon Resource Name of the S3 bucket.
Example output:
bucket_name = "my-demo-s3-bucket"bucket_arn = "arn:aws:s3:::my-demo-s3-bucket"
🎯 Summary
Components and Purposes:
| Component | Purpose |
|---|---|
| Terraform files | Define an AWS resource (S3 bucket) |
| GitHub Actions pipeline | Automates validation, planning, and creation |
| AWS Secrets | Secure authentication |
| CI/CD | Eliminates manual terraform apply |
In Simple Terms
“This project automatically creates an S3 bucket in AWS whenever you push code to GitHub.”
✅ Terraform Files
1. main.tf (Example: Create an S3 Bucket)
terraform { required_version = ">= 1.0" required_providers { aws = { source = "hashicorp/aws" version = "~> 5.0" } }}provider "aws" { region = var.aws_region}resource "aws_s3_bucket" "demo_bucket" { bucket = var.bucket_name tags = { Environment = "dev" Project = "terraform-ci-cd" }}
2. variables.tf
variable "aws_region" { type = string description = "AWS region to create resources" default = "ap-south-1"}variable "bucket_name" { type = string description = "S3 bucket name"}
3. outputs.tf
output "bucket_name" { value = aws_s3_bucket.demo_bucket.bucket}output "bucket_arn" { value = aws_s3_bucket.demo_bucket.arn}
4. GitHub Actions Pipeline
Create a folder .github/workflows/ and add the following YAML:
name: Terraform CI/CDon: push: branches: ["main"] pull_request: branches: ["main"]jobs: terraform: name: Terraform Apply Pipeline runs-on: ubuntu-latest permissions: contents: read id-token: write steps: - name: Checkout source code uses: actions/checkout@v3 - name: Setup Terraform uses: hashicorp/setup-terraform@v2 - name: Terraform Init run: terraform init - name: Terraform Format run: terraform fmt -check - name: Terraform Validate run: terraform validate - name: Terraform Plan run: terraform plan -input=false - name: Terraform Apply if: github.ref == 'refs/heads/main' run: terraform apply -auto-approve env: AWS_ACCESS_KEY_ID: ${{ secrets.AWS_ACCESS_KEY_ID }} AWS_SECRET_ACCESS_KEY: ${{ secrets.AWS_SECRET_ACCESS_KEY }} AWS_REGION: ${{ secrets.AWS_REGION }}
📌 Required GitHub Secrets
Navigate to:
GitHub → Repo → Settings → Secrets → Actions
Add the following secrets:
AWS_ACCESS_KEY_ID
AWS_SECRET_ACCESS_KEY
AWS_REGION
🌟 Folder Structure
Your project folder should look like this:
terraform-demo/│├── main.tf├── variables.tf├── outputs.tf│└── .github/ └── workflows/ └── terraform.yml
🎉 Deploy the Project to GitHub
To deploy the project, run the following commands:
git add .git commit -m "Initial Terraform CI/CD pipeline"git push
Upon pushing, GitHub Actions will automatically:
- Init
- Validate
- Plan
- Apply
Steps: Create IAM Role for GitHub Actions (OIDC)
Step 1: Add GitHub OIDC Provider (One-Time)
Skip this step if it already exists in your AWS account.
AWS Console
- Go to IAM
- Click Identity providers
- Click Add provider
Provider settings
- Provider type: OpenID Connect
- Provider URL:
https://token.actions.githubusercontent.com - Audience:
sts.amazonaws.com
- Click Add provider
✅ GitHub is now trusted by AWS
Step 2: Create IAM Role
- Go to IAM → Roles
- Click Create role
Step 3: Select Trusted Entity
- Choose Web identity
- Identity provider:
token.actions.githubusercontent.com - Audience:
sts.amazonaws.com - Click Next
Step 4: Attach Permissions Policy
For demo/testing, you can attach:
AmazonS3FullAccess
For Terraform production use, common options:
- Custom least-privilege policy
- OR temporarily:
AdministratorAccess
👉 Recommended later: custom Terraform policy
Click Next
Step 5: Role Name & Create
- Role name:
github-actions-terraform - Description:
IAM role assumed by GitHub Actions via OIDC for Terraform deployments
Click Create role
Step 6: Edit Trust Policy (IMPORTANT)
After role creation:
- Open the role
- Go to Trust relationships
- Click Edit trust policy
- Replace with:
{ "Version": "2012-10-17", "Statement": [ { "Effect": "Allow", "Principal": { "Federated": "arn:aws:iam::<ACCOUNT_ID>:oidc-provider/token.actions.githubusercontent.com" }, "Action": "sts:AssumeRoleWithWebIdentity", "Condition": { "StringEquals": { "token.actions.githubusercontent.com:aud": "sts.amazonaws.com" }, "StringLike": { "token.actions.githubusercontent.com:sub": "repo:<GITHUB_ORG>/<REPO_NAME>:*" } } } ]}
Replace:
<ACCOUNT_ID>→ AWS account ID<GITHUB_ORG>→ GitHub org or username<REPO_NAME>→ Repository name
✅ This locks access to only your repo
Step 7: Verify Role ARN
Copy the Role ARN, example:
arn:aws:iam::123456789012:role/github-actions-terraform
You will use this in GitHub Actions.
Step 8: Update GitHub Actions Workflow
In your GitHub Actions YAML:
permissions: id-token: write contents: readsteps: - name: Configure AWS credentials uses: aws-actions/configure-aws-credentials@v4 with: role-to-assume: arn:aws:iam::123456789012:role/github-actions-terraform aws-region: us-east-1
🚫 No AWS access keys needed
✅ Secure, short-lived credentials
Step 9: Test the Setup
- Push code to GitHub
- GitHub Actions runs
- AWS CloudTrail shows:
AssumeRoleWithWebIdentity - Terraform executes successfully
Recommended Next Hardening (Best Practices)
- Restrict
subto specific branches:
"repo:org/repo:ref:refs/heads/main"
- Use separate roles per environment
- dev
- staging
- prod
- Replace
AdministratorAccesswith least privilege
Quick Checklist ✅
✔ OIDC Provider added
✔ IAM Role created
✔ Trust policy locked to repo
✔ Permissions attached
✔ Role ARN used in GitHub Actions


One response
Nice Article.
LikeLike